In this article, I would like to discuss XAMPP Multi-Port Configuration: Host Multiple Websites on One Server Easily. Setting up XAMPP with Multi-Port allows you to run multiple web applications or websites on a single server. XAMPP is a popular development environment that bundles Apache, MySQL, PHP, and other tools.
Xampp’s default port is 80 and 443. If you have many projects and want to set up those projects with a different port in xampp called “Virtual Hosts”. This is how to Setup XAMPP Multi-Port Setup: Run Multiple Websites on a Single Server. Here’s a step-by-step guide on how to set up XAMPP multi-ports:
Download and Install XAMPP
If you haven’t already, download and install XAMPP from the official website (https://www.apachefriends.org/index.html).
Launch XAMPP Control Panel
After installation, open the XAMPP Control Panel. On Windows, you can do this by searching for “XAMPP Control Panel” in the Start menu.
Configure XAMPP Multi-Port
By default, Apache runs on port 80. To run it on multiple ports, you need to configure Apache setup with multiple ports you want to use.
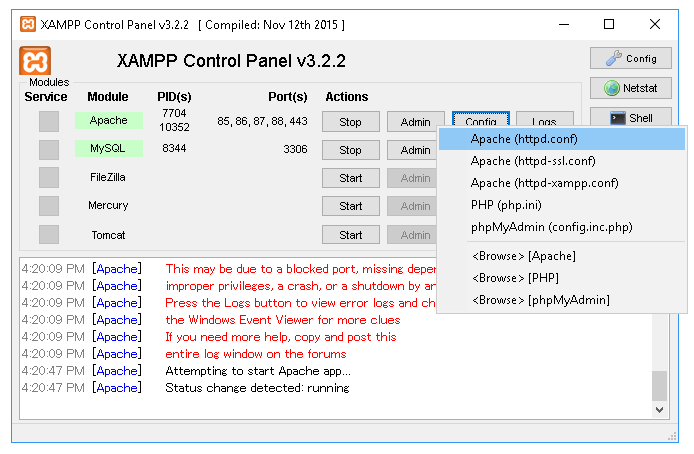
- In the XAMPP Control Panel, click on the “Config” button for Apache.
- Select “httpd.conf” from the dropdown menu. This will open the Apache configuration (“C:\xampp\apache\conf\httpd.conf”) file in your default text editor.
- In the configuration file, search for the line that says
Listen 80(this is the default port). To add more ports, you can copy this line and change the port number. For example:1234Listen 85Listen 86Listen 87Listen 88d. Save the configuration file and close the text editor.
Configure Virtual Hosts (Optional)
If you want to set up multiple websites with different domain names or subdomains, you can configure virtual hosts.
- In the XAMPP Control Panel, click on the “Config” button for Apache again.
- Select “httpd-vhosts.conf” from the dropdown menu. This will open the virtual host configuration file in your default text editor.
- Add virtual host configurations for each port you’ve defined in the previous step. For example:
12345678910111213141516171819202122232425262728293031323334353637383940414243444546474849505152535455# vhosts - my-profile:<VirtualHost *:85>DocumentRoot "C:/xampp/htdocs/my-profile"ServerName localhost:85<Directory "C:/xampp/htdocs/my-profile">Require all grantedOptions -Indexes +FollowSymLinks +MultiViewsAllowOverride AllOrder allow,denyAllow from all</Directory>LogFormat "%h %l %u %t \"%r\" %>s %b \"%{Referer}i\" \"%{User-agent}i\"" combinedSetEnvIf Request_URI "(\/assets\/)" dontlogCustomLog C:\xampp\Apache24\logs\myweb-access.log combined env=!dontlogErrorLog C:\xampp\Apache24\logs\myweb-error.log</VirtualHost># vhosts - website:<VirtualHost *:86>DocumentRoot "C:/xampp/htdocs/academia/website/dist"ServerName localhost:86<Directory "C:/xampp/htdocs/academia/website/dist">Require all grantedOptions Indexes FollowSymLinksAllowOverride AllOrder allow,denyAllow from all</Directory></VirtualHost># vhosts - api:<VirtualHost *:87>DocumentRoot "C:/xampp/htdocs/academia/api/public"ServerName localhost:87<Directory "C:/xampp/htdocs/academia/api/public">Require all grantedOptions Indexes FollowSymLinksAllowOverride AllOrder allow,denyAllow from all</Directory></VirtualHost># vhosts - admin:<VirtualHost *:88>DocumentRoot "C:/xampp/htdocs/academia/admin/public"ServerName localhost:88<Directory "C:/xampp/htdocs/academia/admin/public">Require all grantedOptions Indexes FollowSymLinksAllowOverride AllOrder allow,denyAllow from all</Directory></VirtualHost>
Make sure to replace the paths and domain names with your own.
- Save the virtual host configuration file and close the text editor.
Edit Hosts File (Windows Only)
On Windows, you’ll need to edit the hosts file to map domain names to IP addresses.
- Open Notepad as an administrator.
- Open the hosts file located at
C:\Windows\System32\drivers\etc\hosts. - Add entries for your domain names and map them to
127.0.0.1. For example:123456# 127.0.0.1 localhost# ::1 localhost127.0.0.1 127.0.0.1:85 // host with new port.127.0.0.1 127.0.0.1:86 // host with new port.127.0.0.1 127.0.0.1:87 // host with new port.127.0.0.1 127.0.0.1:88 // host with new port. - Save the hosts file.
Restart Xampp
In the XAMPP Control Panel, stop and then start the Apache server to apply the changes.
Access Your Websites
You can now access your websites by entering the domain names or IP addresses with the corresponding ports in your web browser. For example:
- http://localhost:85
- http://localhost:86
- http://localhost:87
- http://localhost:88
That’s it! You’ve set up XAMPP with multiple ports, allowing you to run multiple web applications or websites on your local server for development and testing.


Leave a Comment